How to light outdoor interviews
A tutorial on how to shape the sun's light when filming outside.

Ever been in this situation:
It's time to shoot a video and you're trying to find a location around your church that will work, but the office is too noisy, the sanctuary is too dark, the lobby is too ugly, your production studio doesn't exist, and you're running out of viable options. What's a church filmmaker to do?
Enter the great outdoors.
Whether it's your announcements or a testimonial, filming outdoors comes with a bunch of perks: it's free, there's plenty of light, you get copious amounts of Vitamin D, you're not sitting in front of a computer screen dying a slow death, and it's free.
However, it comes with its own set of unique challenges (cue Pastor Squints McGee melting in the sun), so this post is not only going to show you how to overcome those challenges, it's going to show you how you can turn your outdoor videos from meh to cinematic goodness in 5 easy steps.
Step One: Find Somewhere quiet
This step sounds obvious, but I don't know how many times I've been on shoots where we picked an outdoor location based on our vague memory (hey, I know this park by my house that would be a perfect place to shoot) or by location scouting via Google Maps and didn't actually go to check it out in person. While the location looked perfect in our memory or on The Google, when we showed up we realized it's under a direct flight path or right next to a construction site.
Nothing will ruin a shoot faster than a noisy environment, so even if you're familiar with the location (i.e. outside your church building) go back out there, look around, and listen. And don't just listen for a few seconds, stay out there for a good 10-15 minutes and see if you notice any patterns: is there a road nearby that get's busy every few minutes? do airplanes fly over every 10 minutes? is there a business next door who's front door opens and bangs closed every couple of minutes?
Also, I highly recommend going outside to listen around the same time frame that you plan on filming. The location might sound pristinely quiet at 10am, but at 3pm when the school down the street lets out it might sound like all heck is breaking loose.
Step Two: Find the sun

When shooting outdoors you have two options: fight against the sun or work with it. As of today, the sun is undefeated (2,238,743,028,303 - 0 to be exact) so I recommend working with the sun. In order to work with the sun you not only need to know where it is, you need to know where it's going to be during your shoot. There are two ways to do this:
Use a free resource like suncalc.net to find your location and then use the slider at the top to figure out where the sun is going to be at what time.
If you don't mind spending a couple bucks to know EXACTLY where the sun is going to be you can buy the SunSeeker app on your Apple or Android phone. I use this app on almost every shoot I do. Not only will it show you where the sun is going to be at on the map, it has a live, augmented 3D mode that will show you exactly where the sun is going to be by using your phone's camera (and when it's going to hide behind that tree....looks like we'll be in the clear until about 2pm).
*Side-note about the sun: During the summer, the sun will be higher up in the sky and during the winter it will be lower all day. Personally, I'm a fan of the winter sun as it is more directional and becomes easier to shape, but I also live in San Diego and can film outside all year around so......(sorry northerners).
Step Three: Shoot into the sun
Now this might sound counter intuitive, after all if the sun is your best source of light, why not use it as your main source (your "key light")? I do this for a few reasons:
It keeps the harsh sun out of your talent's eyes.
It helps you avoid harsh shadows on your talent's face.
It helps you avoid boom mic shadows in the frame.
It creates a nice, natural backlight on your talent (which helps separate them from the background and make them look all fancy like).
It helps you to find a darker background to shoot into so your talent stands out which will help the viewer focus on the person. #contrast!

If you don't do this and shoot with the sun at your back, your background is going to be just as bright as your on-camera talent, if not brighter (and if you use any sort of diffusion to lessen the sun's direct harshness on your talent, as a byproduct that's going to make your talent darker which will make your background even brighter!)

*Side-notes about shooting into the sun: I look around for a location where there will be objects in the background to create shadows - trees, buildings, etc. - to help create darker spots in the frame so my on-camera talent pops from the background more. However, even if you were choosing to film in an open field with no shadowy background, I'd still shoot into the sun for all the other benefits noted above.
Also, you don't have to shoot perfectly perpendicular into the sun for this to work, just find a background that is in the general direction of where the sun is going to be. Remember, the sun is going to keep moving, so it's best to plan for larger areas that will look good for a few hours.
Step Four: Shape the light
If you were to not heed my advice (why would you do such a thing?!) and you decided to film with the direct sunlight behind you, you'd find out that it's very hard to shape direct sunlight. Your two options would be to either blind your on-camera talent with the direct sun or you could put up a big frame of diffusion which would soften the light, but would also spray the light all over the place. Your talent would thank you, but then your talent would also look very flat and non-cinematic (like every bad Christian movie where shadows don't exist).
However, if you were to heed my advice (I'm proud of you) and shoot into the general direction of the sun, you'll have a much easier time at shaping the light into something that looks good. To do that you'll need two things:
A big, soft bounce.
Negative fill.

If you've read or watched any of my other lighting tutorials you'll know that I'm a fan of big, soft lighting. For this step I'm going to reference a shoot that I did not too long ago and show you how I did it:For this particular shoot I rented a 6' x 6' frame and an Ultrabounce rag. (Ultrabounce is a little on the harsher side when it comes to bounces, but it's what I had available to me for this shoot.) However, something like this 6' x 6' Chimera Kit from Lensrentals would probably do a great job & would be way less heavy and less dangerous (more on that later). That Chimera kit or a Scrim Jim is what I would recommend if you're thinking about making a purchase. We had 2 different size Scrim Jim's at the church I used to work at and they were great - very portable and lightweight.As you'll notice in the above diagram, the bounce is off to the side and since it was so big, I was able to pull it even further away from the on-camera talent. This did three things:
It made it comfortable for the talent. She could look right at the interviewer without feeling any glare from the light at all.
It gave her a very flattering light that wrapped beautifully around her.
It gave her a nice eye light. (go ahead, look at that glimmer!)

As you'll notice in the above frame from the video, the light has a lot of shape to it as it subtly goes from bright to dark as it moves across her from left to right. Having the big bounce off to the side (instead of more in front of her) helped create that, but what really gave it that dramatic look was introducing negative fill to the right side of her body.
If you're not familiar with the term negative fill, it is the process of taking away light from your frame. This is a very important step, especially when you're filming outdoors because even though that bounce is coming in from the side, the sun is bouncing off of EVERYTHING outdoors - the grass, the sky, the concrete, any tree or building within a few hundred feet, etc. Because of that, the right side of her face was still pretty bright, so we used a 4' x 4' floppy on a C-Stand and walked it in as close as we could get to her without showing up in the frame.

The closer you get to the person, the more light you'll be blocking and the darker that side of the person will get. For this particular story I knew the subject matter was going to be pretty dramatic (overcoming the death of a close family member), so I wanted it to look more dramatic with a darker shadow side.
Also, 4' x 4' floppies are great to have on hand, but if you want something that is more versatile, lightweight, and portable (but unfortunately more expensive) you could buy the 4' version of the ScrimJim and get a solid for it to create negative fill.
*Side-note about bounces & floppies: Using light modifiers outdoors can be dangerous on windy days & should always be used with proper safety precautions. Even on a non-windy day, sometimes it only takes a good breeze to come through and knock over your frames (because they become big sails). The closer your stands and modifiers are to your talent, the more important it is to err on the side of safety.
To be safe I recommend using stands like this Combo Stand instead of normal C-Stands as they have a much better center of gravity, a wider spread, and are better suited for the outdoors. Also, put more sand bags than you think you need on the stands & always have a leg perpendicular to whichever way the stand would fall if the wind picks up (for a visual watch this C-Stand safety video)
Step Five: Select the right lens

As much as I would love to say that I always select my lens based on how I want the content to look and feel, often times I'll select my lens based on what I want to show or what I need to hide.
A good general rule for all types of video shoots is:
The better the background, the wider the lens.
If you look closely at Hollywood films, you'll notice that they use wide angle lenses a lot - even for close ups! Instead of switching to a much longer lens, often times they'll just move the camera closer. Things are always situational as to why they would choose to do that, but one big reason is: because they can. Since they have the budget to have great locations and great set design, they don't have to worry about hiding things because everything in the scene has been designed to be seen on camera. Since we probably don't have that luxury, we may have to choose our lenses and our angles based on what we need to hide from the camera.
However, beyond hiding things, I have two other things that guide my lens selection:
If the background adds context to the subject matter, include it by using a wider lens. For example, let's say you travel for a special outreach project and you're filming your pastor on location about your church's hurricane relief efforts and he's in front of a house that's been completely devastated, you could use a wider lens to include the devastation in the shot and make it more powerful.
If the background doesn't add context to the subject matter, obscure it by using a longer lens. Let's say for that same video you couldn't film your pastor at the location of the devastated house and you needed to film him outside the hotel instead... You could film him on a longer lens that shows less of his surroundings AND throws the background further out of focus to obscure the fact that you're outside the hotel. The nice thing about this is that if you choose the right background, a close-up shot outside the hotel and a close-up shot in front of the house that's been completely devastated would probably look the same. Cut that footage together with some b-roll of the devastation and visually it will feel like your pastor is out there in the neighborhood somewhere.
For this particular project I was filming a testimonial about how training for and running this race was how Sara honored a deceased family member and coped with the loss. Because of this I knew that the video would include race photos as well as B-Roll of her running and training, so being outside at a park was fitting to her story.
Since I had location scouted and picked a good direction to film, I knew that I could film on a wide, medium, or close-up with no problem and I knew that the background would fit the context of the story. I also knew that the story might get emotional and that I'd probably want some close ups during that portion of the interview so I shot the whole thing on a zoom lens and adjusted my frame throughout the interview.

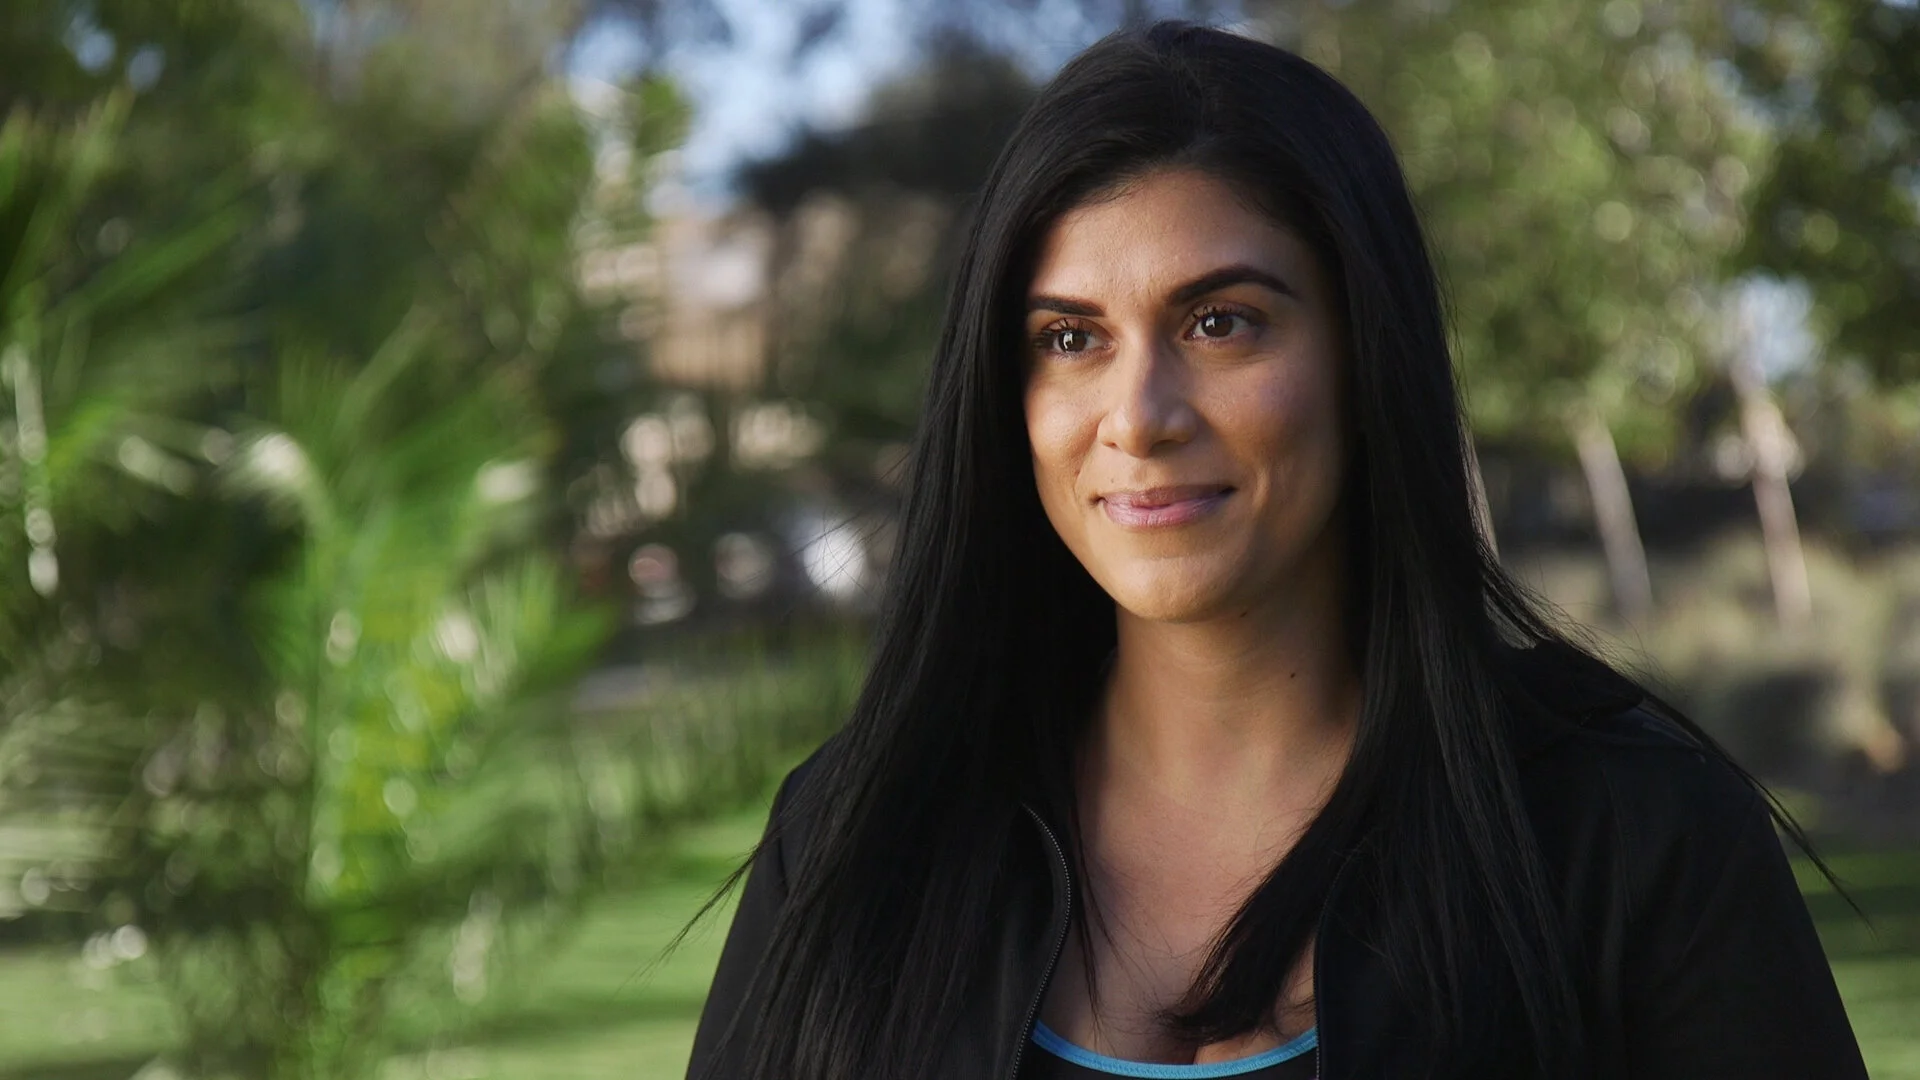
From a story standpoint, it was nice to have this wide shot for the content that would likely be at the beginning of the video - info that would establish who she is, etc., but wouldn't be dramatic or emotional. From a technical standpoint, you can see that being on a wide angle shows the grass in the background which is very bright. Ideally I'd prefer Sara to be brighter than the background, but that's not the case in this frame. Overall not bad, but not as good as I would have liked.

Once I zoomed in a little I was able to frame out some of the brighter portions of the background, which helped make Sara stand out better. Also, the background gets blurrier which also helps direct your eyes towards Sara.
The close-up is where this setup really shines - look at how much shape we were able to create outdoors! By zooming in with the lens I've cropped out most of the bright portions of the background and the ones that remain are so far out of focus that it's actually adding beautiful bokeh to the shot. Her face is now the brightest portion of the frame which immediately draws your attention and you can see the nice eye light which will be even further accentuated when she gets teary-eyed during part of her story.
And there you have it. If you follow those 5 steps you can bravely enter the great outdoors and know that you'll be heading back to the edit with a card full of intentionally lit images.
JOIN CHURCH FILMMAKERS FROM ALL OVER THE WORLD
Enter your first name and email below and you'll get exclusive tips, tricks, and trainings delivered straight to your inbox. As a bonus for signing up I'll send you our favorite filmmaking trick that I use on every testimonial film I create.